How to do Inverted Rows, Bodyweight Rows, and Australian Pull-ups with Excellent Technique to Maximize Your Results & Minimize the Risk of Injuries.
Note: Inverted Rows are also commonly called Bodyweight Rows, Australian Pull-ups, Horizontal Rows/Pull-ups and some other silly names. They all describe the same basic exercise, which involves a horizontal upper body pulling motion using your own body weight as the primary resistance.
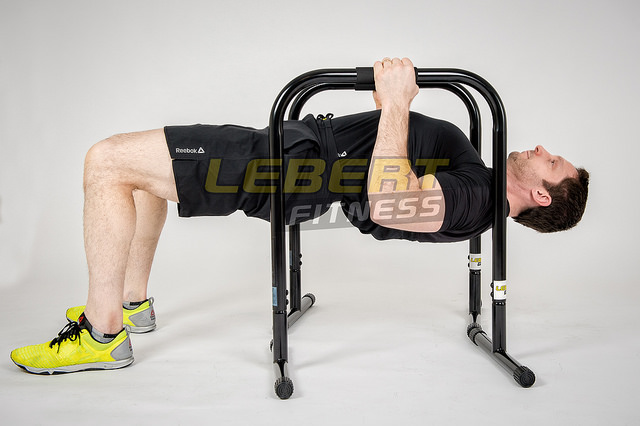
Note: the Lebert Equalizer is a great tool for inverted rows!
Anyone can do inverted rows (or a variation of them), but most people have some room for improvement when it comes to their technique. And that’s what this tutorial is for: to help you optimize your bodyweight rowing form to maximize your results and minimize the risk of injuries.
Inverted Rows are one of a handful of upper body calisthenics exercises that most people should include in their strength training program. They are a great tool for building and strengthening the back and shoulder musculature. And done correctly, they train your whole body to be better at pulling. I consider them an exercise staple.
You should do inverted rows if you:
- want to build and strengthen your back musculature
- want well-rounded upper body development
- do a lot of pushups or other upper body pressing exercises
- have poor posture and/or slumped shoulders (e.g. upper cross syndrome)
- want to improve your strength for pull-ups, chin-ups, the bench press, and other similar exercises
- want to keep your lower back safe when doing pulling exercises
You can do a set of inverted rows using:
- a set of parallel bars or a straight bar set at or above waist height
- any suspension training system (e.g. Rings, TRX, Blast Straps, etc.)
- on a low racked barbell (in a squat rack, power rack, or smith machine)
- the edge of a heavy, sturdy table
Bodyweight rows can be easily modified to accommodate your conditioning level by angling your body to manage how much of your weight is resting on your feet versus how much you’re supporting with your hands.
You can match the inverted row to your skill and conditioning level using the following progression:
- Ultra-Beginner: Feet on the ground (i.e. weight on heels), hands gripping bar at approximately chest or shoulder level with body at 45 degree angle from the ground.
- Beginner: Feet flat on the ground (i.e. mid-foot balance), knees bent at 90 degree angle, hands gripping bar at approximately waist level with body parallel to the floor – from shoulders to knees.
- Intermediate: Feet on the ground (i.e. weight on heels), knees locked, hands gripping bar at approximately waist level with body at roughly 30 degree angle.
- Advanced: Feet flat on an elevated surface (i.e. mid-foot balance), knees bent at 90 degree angle, hands gripping bar at approximately waist level.
- Mastery: Feet elevated to be roughly level with or slightly higher than hands.
Now, this tutorial will cover both the basics and also the nitty-gritty details of proper bodyweight rowing form. And so, whether you’re a beginner who wants to start training right from the start, or an advanced trainee who wants to clean up your technique, this in-depth tutorial is for you.
How to do Inverted Rows with Excellent Form
Inverted Rows – Technique Tips
Hand Positioning & Grip – You can use an overhand, underhand, or neutral grip. Make sure that your wrist is neutral (i.e. straight, not flexed), and that your hands are approximately shoulder-width apart.
Elbows – Keep elbows in tight with your ribs – not flared out to the sides. Elbows should reach full lockout in the bottom position and full flexion in the top position.
Shoulders – Keep your shoulders packed down (i.e. stabilized) on your torso throughout the full range of motion. Gently relaxing the shoulders in the bottom position is permissible, when done slowly, under control. Also, be sure to fully retract your shoulders (i.e. pinching your shoulder blades together) as you pull yourself into the top position.
Spinal Alignment – Maintain a lengthened, neutral spine throughout the full range of motion – from the crown of your head to the tip of your tailbone, which should be slightly tucked. Do not round or arch your back. Do not flex or extend your neck.
Core Activation – When initiating the pull, contract the entire corset of muscle around your core, including your glutes, to create stability and to assist with the power generation of the exercise.
Feet and Legs – Your feet can be flat on the floor with knees bent (i.e. mid-foot balance), or heels on the floor with knees locked (i.e. straight) and toes pulled back, or elevated on a box/bench/step/etc. for additional challenge. When legs are straight, lock your knees and point your toes. Contract your thighs, regardless of leg positioning.
Breathing – When initiating the pull – and in combination with a strong core contraction – exhale forcefully out of your mouth. Inhale passively as you lower yourself back down.
Range of Motion – In the bottom position, your elbows should be locked and shoulders relaxed, but not “loose.” In the top position, your elbows should be fully flexed and shoulders fully retracted (i.e. pinched together), with elbows pointing behind you and hands just outside the front of your ribs – at or slightly below chest level.
Common Mistakes
- Not using a full range of motion, and in particular, not achieving full elbow lockout in the bottom position and/or not achieving full scapular retraction in the top position
- Arching the back or letting it sag (i.e. round)
- Flaring the elbows out to the sides
- Holding your breath
Final Words
Horizontal pulling is a critical, and yet, often-neglected functional movement pattern, and the inverted row is by-far, one of the best choices for strengthening it. When you integrate all of the above points into one seamless movement, you will strengthen your whole body to be better at pulling – and build a strong, back, core, shoulders, and arms to prove it!
If you want to succeed with fitness over the long term, it’s critical to train with correct form. And if you get the technique mastered in the beginning, it’ll pay of in the long run. Mastering the bodyweight row will set a strong foundation for more advanced training down the road. So, plug this exercise into your routine, and watch the results come in.
If you found this article helpful, please share it with your friends:
.jpg "John Sifferman")
![]()
Health-First Fitness Coach
P.S. If you liked this post, then please signup for the newsletter, or follow me on Facebook or Twitter for daily updates and other interesting info.
Hi John, I found you on YT when I was researching for inverted rows progression. My goal is to do unassisted pull ups, so thought I’d start with inverted rows to strengthen my back. Thank you for a clear and concise information on the correct technique. I’m an ultra beginner. I’m curious to find out how many reps I should do before progressing to the next level? Also, if you could do a video showing the progression from ultra beginner to Mastery, that will be super awesome! Thank you for your great work!