What You Need To Know About The Hip Thrust Exercise To Get Bigger, Stronger Glutes And Improve Your Performance In Athletics, Lifting, And Life

The hip thrust exercise is a phenomenal tool for targeting the glutes, which are those big, beefy muscles on your bum. The glutes are one of the largest and most powerful muscle groups in the body that are involved in most day-to-day and athletic movements. They are the prime movers in many activities like lifting (e.g. squats, deadlifts, etc.), running, and jumping just to name a few. Unfortunately, most people have weak, dysfunctional glute muscles – and many don’t even know it. Furthermore, most people think that squats and deadlifts are the best exercises for targeting the glutes, but that isn’t necessarily true.
Benefits of the Hip Thrust Exercise
So, why would you want to focus on training your glutes? Well, here are three reasons:
1. You’ll get stronger, and as a result…
2. You’ll perform better. Your lifts will likely increase (e.g. squats, deadlifts, etc.). You’ll be able to run and sprint faster. You’ll have a greater capacity for improved performance in the future, and as a result…
3. You’ll look and feel better. And that’s the real reason why a lot of people train, after all. So, if you want to transform the ol’ posterior chain (i.e. your backside), then the hip thrust should be a regular choice in your program.
Now, there are many great ways to train the glutes. Squats, deadlifts, lunges, step-ups, kettlebell swings, jumping, and sprinting are just a handful of the many great ways to train them. And all of these are functional, practical, full-body exercises and/or movement skills that have immense benefits. So, why bother with the hip thrust exercise, which is technically an isolation exercise that targets the glute musculature?
There are two reasons. First, the hip thrust is one of the most effective – if not the most effective exercise – for activating the glute musculature, according to EMG studies. In fact, research has found that the hip thrust activates the glutes 2-3 times more than squats do. And done together in the same program, they become a powerful combo.
Strength and conditioning specialist, Bret Contreras, who is known informally as “The Glute Guy” said that, “Due to several factors, the hip thrust greatly outperforms squats and deadlifts in glute activation… For these reasons, the glutes fire 2-3 times harder in a hip thrust compared to a squat depending on whether examining the mean or peak activation levels” (source).
The second reason you may want to use the hip thrust is that most people have major problems with their glute muscles. In fact, most people have a hard time just contracting their glutes – period – let alone contracting them maximally. The reasons are many, of course – one of the main culprits being that we sit on our butt’s for long periods of time. Unless you train them frequently, we typically don’t use them very much in day-to-day life. So, the glutes forget how to contract. It’s called sensory motor amnesia. Essentially, the nervous system short-circuits and you can’t fully or properly contract a particular muscle group.
And given that the glutes are one of the largest, most powerful, and most important muscles in the body, this dysfunction is a major problem! Fortunately, the hip thrust is one of the best exercises for teaching your glutes how to fire and perform at their best.
So, who would benefit the most from including the hip thrust exercise into their fitness routine?
Who is the hip thrust exercise best-suited for? Well, you should strongly consider doing the hip thrust…
- If you regularly sit for long periods of time.
- If you have weak, under-developed glutes or if you have trouble contracting your glutes to their full capacity.
- If you want to get stronger and look/feel/perform better.
So, in this hip thrust how-to tutorial, I’m going to teach you how to do the hip thrust not just properly, but optimally, in order to maximize the benefits you receive from the exercise and minimize the risk of injuries or other problems – and get you some great glutes!
Check out the video tutorial first.
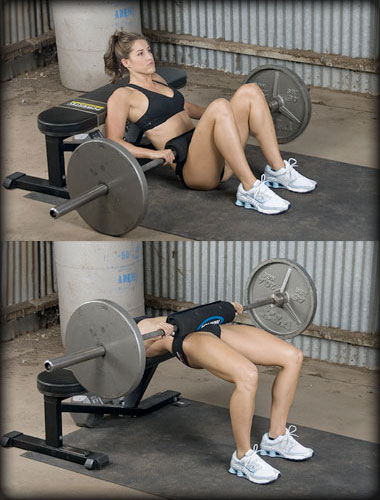
How to Perform The Hip Thrust Exercise Properly
Note: this is the bodyweight version of the hip thrust exercise, which is the most basic variation that everyone should get started with regardless of training history or skill level. I don’t care if you can squat 405 lbs raw. Do it right, and start off with the rudimentary progression. But keep in mind that there are many great ways to increase the difficulty of the exercise, such as single-leg variations, or by adding load via a resistance band, barbell, sandbag, etc. Just make sure that you master the bodyweight variation first and progress gradually from there. Your glutes – and the rest of your body – will thank you.
How to do the Hip Thrust Exercise – Technique Tips and Strategies
Setup: Lean against a bench or other support that’s approximately knee-height or slightly lower and rest your shoulders on the edge. Your torso should be at about a 45 degree angle, and your feet should be planted in a hip or shoulder-width squat position – keeping your toes pointing straight ahead or slightly angled outwards (whatever foot position is most comfortable for you). Your spine should be in a neutral position, lengthened in both directions (ie lift with the crown of your head and slightly tuck your tailbone). Your bodyweight should be evenly distributed between your feet and shoulders. Do not place any weight on your neck.
Execution: Pressing through both feet with a mid-foot drive (i.e. feet flat), exhale forcefully and contract your core musculature as you drive through your feet and extend your hips upwards. Squeeze your glutes and keep pressing through your feet until you reach full hip extension (i.e. not over-extension!). Your torso and thighs should be roughly parallel with the ground – knees at a 90 degree angle. Pause for a moment, and then slowly lower your hips – smoothly, under control – until either a) your bum is hovering just above the ground, or b) your bum slightly touches the floor (i.e. without putting much weight on it – don’t rest your weight on the floor between reps). Pause for a moment in the bottom position, and then begin the hip thrust again.
Additional notes on hip thrust technique:
Spinal Alignment – Ideally, the spine should remain in a neutral position at all times. And with the hip thrust exercise, this is especially important for your lumbar spine. If your pelvis and lumbar spine are not in a neutral position (or slight posterior pelvic tilt), then you’re not performing the hip thrust exercise properly. This is not as risky when performing just the bodyweight variation of the exercise (i.e. unless you have a pre-existing condition), but it becomes very important when you add additional load (e.g. barbell hip thrusts).
So, try to keep your spine lengthened in both directions. Lift your head away from your shoulders, tucking your chin slightly and lengthening your neck while simultaneously reaching your tailbone in the other direction – tucking your tailbone slightly (i.e. a slight posterior pelvic tilt). Do not arch or round the back or extend the neck. Some neck flexion is okay and might even help to cue proper technique of the exercise. Just make sure that you’re not flexing it excessively and creating tension in your neck, head, and shoulders. And of course, be extra careful if you have pre-existing back/spinal problems.
Ensure that you maintain this neutral, lengthened spine throughout the entire duration of the set – making sure that the movement is coming from the hip extension and flexion – not from any spinal movement.
Foot Positioning and Leg Drive – The best position for your feet is either hip-width or shoulder-width apart with your toes pointing either directly forwards or slightly angled outward. For those who have tighter hips with limited range of motion, it’s okay to place your feet a little wider (e.g. shoulder-width or slightly wider stance ) or to angle your feet out a little more. Experiment with what feels best for you. Wherever you feel the least amount of strain/tension/weakness/pain/etc. and the most amount of stability/control/strength/etc. – that’s your position.
Press through your feet with a mid-foot balance, and keep your knees lined up over your ankles and feet at all times – not bowing inwards or outwards, but stacked on top of your ankles like a pillar.
Note: you can also drive through your heels, and this may help to increase the glute activation. Just make sure you’re not pressing through your ball of foot.
Hip Recruitment – Your hips should extend fully in the top position, but don’t over-extend them (i.e. hyperextension). Think of the top position like locking out a deadlift at the top. You don’t want to go too far forward because it will break spinal alignment. Hinge at the hips to lower your bum back down.
Shoulder Pack – Keep your shoulders packed down and stabilized on your ribcage throughout the full duration of the exercise. Actively contract the lat muscles to keep the shoulders down on your torso to provide a stable platform to support your bodyweight. Your weight should be resting on the lower portion of the shoulder blades.
Note: if your shoulders have a tendency to round forward during your everyday posture, you may want to retract them backwards slightly in addition to packing them down. You can also experiment with resting on your mid-back instead of the shoulders.
Core and Glute Activation – When thrusting your hips upward, activate your entire core musculature with a forceful contraction while also squeezing the glute muscles, which results in a slight tailbone tuck (i.e. posterior pelvic tilt – similar to a dog tucking its tail between its legs). This will provide a stable platform to protect your spine, and will assist in the power generation of the exercise. Your exhale should be timed with this contraction (see below). Also, make sure that you squeeze your glutes hard in the top position.
Breathing Technique – In combination with the core and glute activation (and the resulting hip thrust), actively exhale the air out of your mouth until most or all of it is expelled. This should be a forceful exhale. As you lower your bum back down, allow an inhale to be sucked back in as you relax your lungs and throat (actively inhaling is unnecessary and may result in lightheadedness from temporarily over-oxygenating your blood).
Note: there are some instances where it would be best to deviate from these recommendations. For example, I’ve instructed you to drive through a mid-foot balance, which is the optimal position for leg drive. However, if you’re having trouble activating your glutes, it might be beneficial to press through your heels to see if that helps with the glute recruitment. The point is to experiment and see what works best for you, your body type, and any pre-existing conditions you may have that affect your performance of the exercise.
Common Mistakes
- Not training through a full range of motion.
- Not maintaining a neutral spine throughout the full range of motion. And in particular, hyper-extending the hips too far upward in the top position, resulting in an arched lower back. Don’t arch your lower back!
- Performing the exercise ballistically instead of under control. You’ll get much better results if you execute the reps slowly and smoothly – not rapidly. This is not like a power clean or a kettlebell swing. So, the upward thrust should be a powerful, but controlled movement (similar to executing a pull-up – fast, but not reckless), and the lowering phase (i.e. eccentric) should be done slowly, under control. Also, a good rule of thumb is that you should be able to stop and hold the position at any point in the range of motion.
- Not pressing through a mid-foot balance (e.g. pressing through the ball of foot, which may result in the heels lifting off the ground).
Final Words
If you want a rockin’ set of glutes, then the hip thrust will serve you well. Now, that doesn’t mean you should stop doing the many other great exercises for the glutes. So, keep up the good work with your squats, deadlifts, lunges, etc. But adding the hip thrust to your routine will absolutely make a big difference in your glute development. It’s the secret weapon of the glute masters.
So, if you want great glutes, take advantage of it. And if you are going to use it, make sure that you learn how to perform it optimally to set a solid foundation for future results down the road. Your buns – and your back – will thank you.
And if you want a more well-rounded glute training program, this book by the Glute Guy himself, will help.
If you found this article helpful, please share it with your friends:
.jpg "John Sifferman")
![]()
Health-First Fitness Coach
P.S. If you liked this post, then please signup for the newsletter, or follow me on Facebook or Twitter for daily updates and other interesting info.
P.P.S. Many thanks to Bret “The Glute Guy” Contreras for teaching and popularizing the hip thrust exercise. I’ve found his resources on the exercise to be invaluable, and the bulk of my study on this particular exercise has been through his website and videos. I think it’s fair to say that the hip thrust is his baby, and you can learn more about it in his guide here.
Photo credit: 1.
I love your posts as they’re very informational and on point :) I’ve done these at the gym but felt so silly doing it in front of everyone as I used a barbell. You mention a band, how would you go about it in detail?
Hey TC,
Just anchor the band at floor level on either side of your hips (i.e. two anchor points, one on each side of you) by wrapping it under/around something heavy (e.g. dumbbells, kettlebells, power rack, etc.). Then wrap the band over your hips so that when you thrust upwards, the band stretches – providing resistance.
I Love the IDEA, cuz I don’t like doing Squats either !! Thnx…